How to Setup the BG-Adamo-4k AI-Auto Tracking Modes (Presenter and Zone)
One of the key features of the BG-Adamo-4k camera is the AI-Auto Tracking. This auto-tracking technology uses the latest human detection AI algorithms to exhibit unparalleled tracking speed and accuracy. This monocular tracking method uses only one camera and one lens to easily detect and capture human forms and moving objects in seconds.
The auto tracking can track in two modes: Presenter Tracking and Zone Tracking. Presenter Tracking tracks its target everywhere without the need to wear any receiving devices or setup additional tracking parameters. It has strong locking and anti-interference capabilities giving presenters the flexibility to leave the stage and interact with the audience while continuously being tracked.
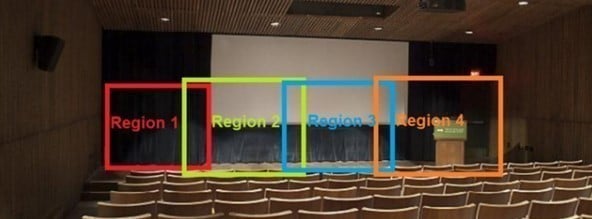
Zone tracking allows the camera to hold its frame in predetermined zones. The camera tracks and moves only when the subject has left one zone and entered the next, then holds the frame in the new zone. If the subject exits the preset zones entirely, the camera will reset to the first zone. The minimum zone allowance is 2 and the maximum is 4 zones.
Both tracking modes can easily be set up with just a push of a few buttons. Let’s dive in!
Presenter Tracking Mode Setup:
Setup for the presenter mode is very simple. Just push a button or two and you are good to go. Presenter mode can be set up in two ways:
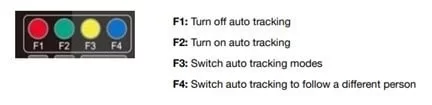
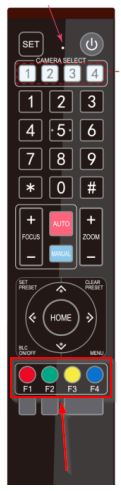 Using the F1-F4 buttons towards the bottom of the IR remote, you can easily operate the auto tracking settings:
 F1: Will turn off tracking mode and put the camera back in the home position
F2: Will activate tracking mode (default is Presenter Mode)
F3: Will switch between tracking modes (Presenter, Zone) when tracking mode is ON
F4: When two subjects are in the frame, this will switch the tracking to the 2nd person who is currently not being tracked.
F1: Will turn off tracking mode and put the camera back in the home position
F2: Will activate tracking mode (default is Presenter Mode)
F3: Will switch between tracking modes (Presenter, Zone) when tracking mode is ON
F4: When two subjects are in the frame, this will switch the tracking to the 2nd person who is currently not being tracked.
 -Once finished, select “Off”:
Zone Tracking Mode Setup:
Just like Presenter mode, Zone mode can be activated in two ways:
-Once finished, select “Off”:
Zone Tracking Mode Setup:
Just like Presenter mode, Zone mode can be activated in two ways:
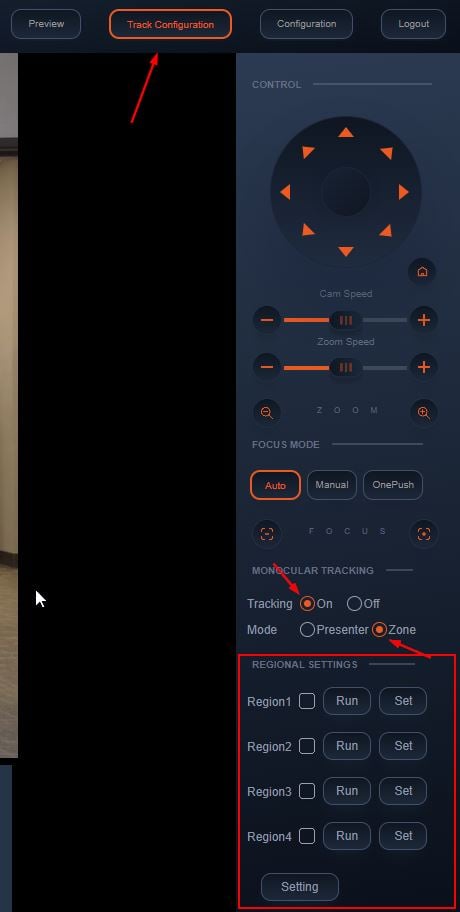 -Using either the remote or web interface, adjust the camera to the desired shot.
-Select “Set” to save the shot on the desired region.
-Preset images will be shown below the preview image.
-Click the check box on the region to enable tracking for the new zone and to save the preset.
-Perform the steps again for at least 1 more zone (up to 4)
Note: Each preset preview image must be continuous from left to right and overlap when setting the tracking regions:
-Using either the remote or web interface, adjust the camera to the desired shot.
-Select “Set” to save the shot on the desired region.
-Preset images will be shown below the preview image.
-Click the check box on the region to enable tracking for the new zone and to save the preset.
-Perform the steps again for at least 1 more zone (up to 4)
Note: Each preset preview image must be continuous from left to right and overlap when setting the tracking regions:
 -Once finished, select “Off”:
- 1. IR remote:
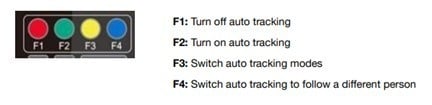
Using the F1-F4 buttons towards the bottom of the IR remote, you can easily operate the auto tracking settings:
F1: Will turn off tracking mode and put the camera back in the home position
F2: Will activate tracking mode (default is Presenter Mode)
F3: Will switch between tracking modes (Presenter, Zone) when tracking mode is ON
F4: When two subjects are in the frame, this will switch the tracking to the 2nd person who is currently not being tracked.
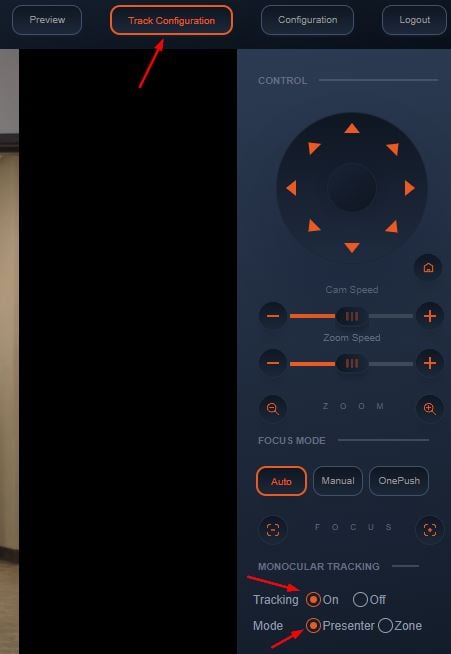
- 2. WebGUI
- 1. WebGUI – The Zone tracking must be set up first using the web interface (webGUI). However, it can be activated using the remote once the setup process has been completed.
-Once finished, select “Off”:
- 2. IR remote:
Get insider
updates & offers
Learn more
Get insider updates and offers
Join our vibrant community of BZBGEAR insiders today and unlock a world of exclusive updates, irresistible offers, and invaluable education.
Sales Inquiries
Leave your phone number, and one of our specialists will reach out to you shortly.
Call Us
Technical support
Monday - Friday
8.00 a.m. - 5.00 p.m. (PST)
8.00 a.m. - 5.00 p.m. (PST)
Saturday - Sunday
10.00 a.m. - 3.00 p.m. (PST)
(by appointment only)
10.00 a.m. - 3.00 p.m. (PST)
(by appointment only)
Phone & Email Support