


How to Live Stream to Facebook with NDI (Windows)
In this article we will review the steps to establish a live stream to Facebook from your Camera’s NDI feed using NewTek NDI Tools. It is assumed that your camera is connected to your LAN and has an IP address that is compatible with your router's settings. If this has not been done refer to our knowledge base articles on addressing your camera here or here.
The NDI protocol from Newtek offers a powerful way to distribute video content on your network using an IP stream. In addition to high-quality video and low latency, NDI allows users to take advantage of NewTek’s Webcam Input (Virtual Camera) to easily link their camera to Facebook Live.
Step 1:
Download NDI Tools Here *Be sure to install all components of the NDI Tools package*
Step 2:
Login to your camera’s web browser interface to enable the NDI stream.
Navigate to Configuration -> NDI and check the box for NDI Enable. Choose an NDI Name that will be easily recognizable and set your NDI Group, if desired. Click Save and reboot the camera.
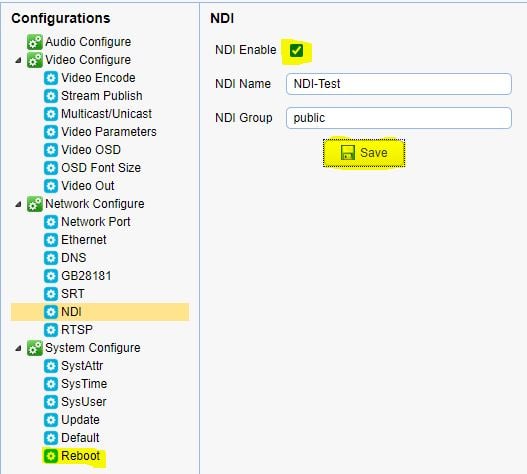 *The camera MUST be rebooted for these settings to apply!*
Step 3:
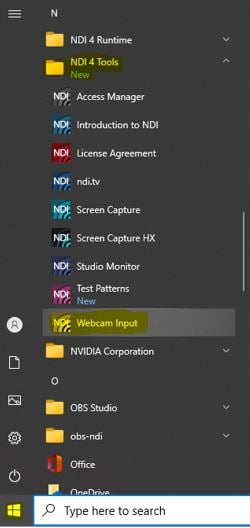
Activate the NDI Newtek Virtual Input by navigating to your Start Menu -> NDI 4 Tools -> Webcam Input.
*The camera MUST be rebooted for these settings to apply!*
Step 3:
Activate the NDI Newtek Virtual Input by navigating to your Start Menu -> NDI 4 Tools -> Webcam Input.
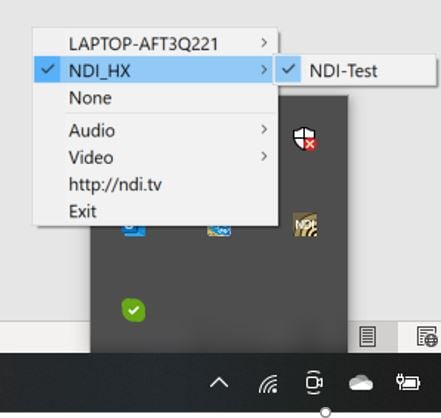
 The Webcam Input icon (NDI Virtual Input) will now appear at the bottom right of your taskbar (sometimes in the hidden icons).
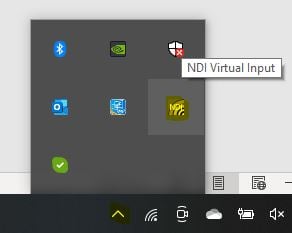 Right-click the icon -> NDI_HX -> (Your NDI Source Name). Make sure your NDI Source is checked to activate.
 Step 4:
Login into your Facebook account and click on the "Live Video" button:
Step 4:
Login into your Facebook account and click on the "Live Video" button:
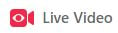 (This is located in the middle of your home page)
Step 5:
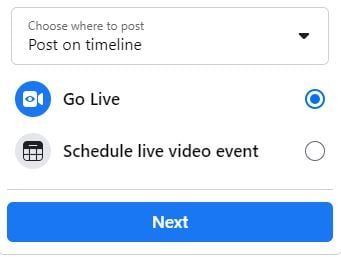
On the Live Producer page, select “Go Live” and then “Next”.
(This is located in the middle of your home page)
Step 5:
On the Live Producer page, select “Go Live” and then “Next”.
 Step 6:
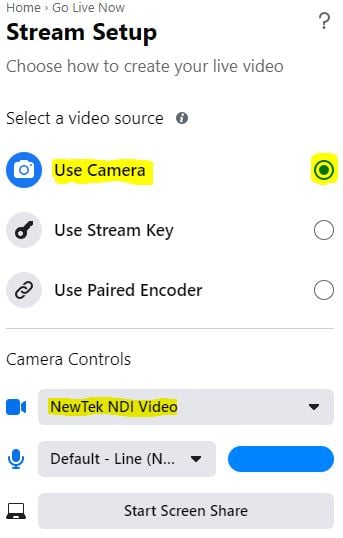
On the Stream Setup page, select “Use Camera” in the video source window.
Select “NewTek NDI Video” from the camera device dropdown list in the Camera Controls window (Your Camera’s NDI Stream should show in the preview window).
Select your audio source and then “Next”.
Step 6:
On the Stream Setup page, select “Use Camera” in the video source window.
Select “NewTek NDI Video” from the camera device dropdown list in the Camera Controls window (Your Camera’s NDI Stream should show in the preview window).
Select your audio source and then “Next”.
 Step 7:
Select your audience, give your live stream a title and description, and select the category. Select “Next” when finished.
Step 7:
Select your audience, give your live stream a title and description, and select the category. Select “Next” when finished.
 Step 8:
You should now be on the dashboard page and ready to start the live stream. Click “Go Live” at the bottom and your stream will begin after the countdown timer.
Step 8:
You should now be on the dashboard page and ready to start the live stream. Click “Go Live” at the bottom and your stream will begin after the countdown timer.
*The camera MUST be rebooted for these settings to apply!*
Step 3:
Activate the NDI Newtek Virtual Input by navigating to your Start Menu -> NDI 4 Tools -> Webcam Input.
The Webcam Input icon (NDI Virtual Input) will now appear at the bottom right of your taskbar (sometimes in the hidden icons).
Right-click the icon -> NDI_HX -> (Your NDI Source Name). Make sure your NDI Source is checked to activate.
Step 4:
Login into your Facebook account and click on the "Live Video" button:
Step 6:
On the Stream Setup page, select “Use Camera” in the video source window.
Select “NewTek NDI Video” from the camera device dropdown list in the Camera Controls window (Your Camera’s NDI Stream should show in the preview window).
Select your audio source and then “Next”.
Step 7:
Select your audience, give your live stream a title and description, and select the category. Select “Next” when finished.
Step 8:
You should now be on the dashboard page and ready to start the live stream. Click “Go Live” at the bottom and your stream will begin after the countdown timer.
Get insider
updates & offers
Learn more
Get insider updates and offers
Join our vibrant community of BZBGEAR insiders today and unlock a world of exclusive updates, irresistible offers, and invaluable education.
Sales Inquiries
Leave your phone number, and one of our specialists will reach out to you shortly.
Call Us
Technical support
Monday - Friday
8.00 a.m. - 5.00 p.m. (PST)
8.00 a.m. - 5.00 p.m. (PST)
Saturday - Sunday
10.00 a.m. - 3.00 p.m. (PST)
(by appointment only)
10.00 a.m. - 3.00 p.m. (PST)
(by appointment only)
Phone & Email Support


