







How to Sync the BZBGEAR Matrix Web GUI and BZBGEAR Switch Control App
This guide explains how to configure a BZBGEAR Matrix Switcher using the Web GUI and then synchronize its configurations with the BZBGEAR Switch Control App.
If you have trouble connecting your BZBGEAR Matrix Switcher to the BZBGEAR Switch Control App, please contact support@bzbgear.com.
1. Configure the Matrix Using the Web GUI
Before configuring the BZBGEAR Switch Control App, we recommend completing the initial Matrix configuration through the Web GUI.
The Web GUI provides access to the full range of configuration options, including:
- Input and output video settings
- Audio routing and settings
- EDID configuration
- Matrix switching
- Video wall configurations
- Multiview configurations
- Network settings
- Other advanced settings available for your Matrix Switcher
First, verify that your video and audio sources are working correctly before creating presets.
Label Your Inputs and Outputs
Once the system is working properly, label all input and output sources in the Web GUI.
Clear labels make it easier to identify sources when creating and using presets. For example, instead of selecting an output based only on its port number, you can identify it by the connected display or location.
We recommend labeling both:
- Input sources
- Output destinations
2. Create and Label Presets
After your inputs and outputs are labeled, create presets for the configurations you expect to use regularly.
Presets are not pre-configured. You must create and save the Matrix, Video Wall, Multiview, or other configurations that you want to recall quickly.
For example, you may want to create presets for:
- Common Matrix routing configurations
- Frequently used Video Wall layouts
- Multiview configurations
- Other frequently used system configurations
Give each preset a clear and descriptive name so it can be easily identified later.
Important: Keep track of the presets you create in the Web GUI. Preset configurations will transfer to the BZBGEAR Switch Control App, but the preset names will need to be entered separately in the App.
3. Add the Matrix to the BZBGEAR Switch Control App
Once the Matrix has been fully configured, labeled, and tested through the Web GUI, add the Matrix to the BZBGEAR Switch Control App.
The configurations and presets saved to the Matrix will be available through the App. However, preset names created in the Web GUI will not automatically transfer as labeled names.
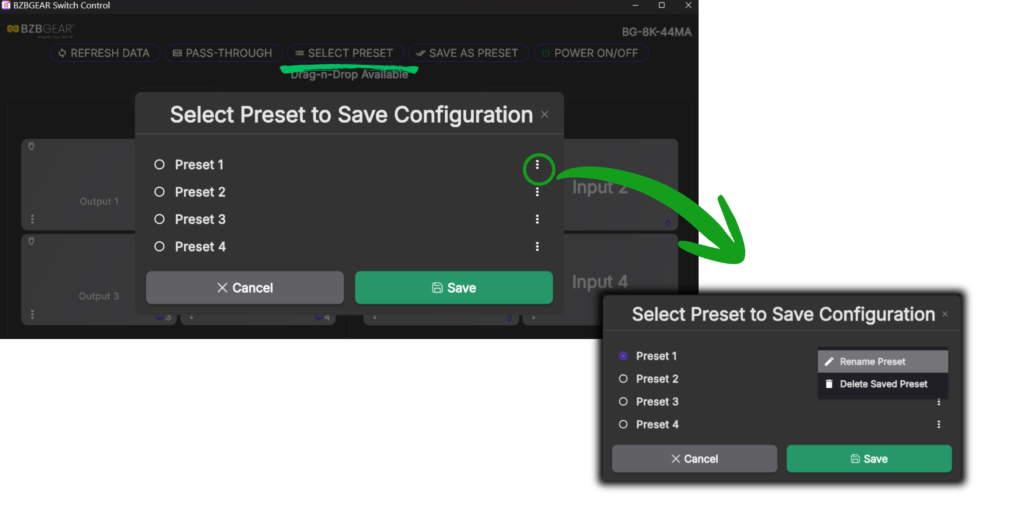
In the App:
- Add your Matrix Switcher.
- Verify that the saved configurations and presets are available.
- Rename the presets to match the names you assigned in the Web GUI.
- Test each preset to confirm that it recalls the correct configuration.
For example, if you created a preset in the Web GUI called "Main Presentation", the corresponding preset in the App should be renamed "Main Presentation" as well.
This makes it easier to ensure that the Web GUI and App remain organized consistently.
Note: You can also create additional presets directly in the App if you need configurations that were not previously saved through the Web GUI.
4. Configure App Permissions for End Users
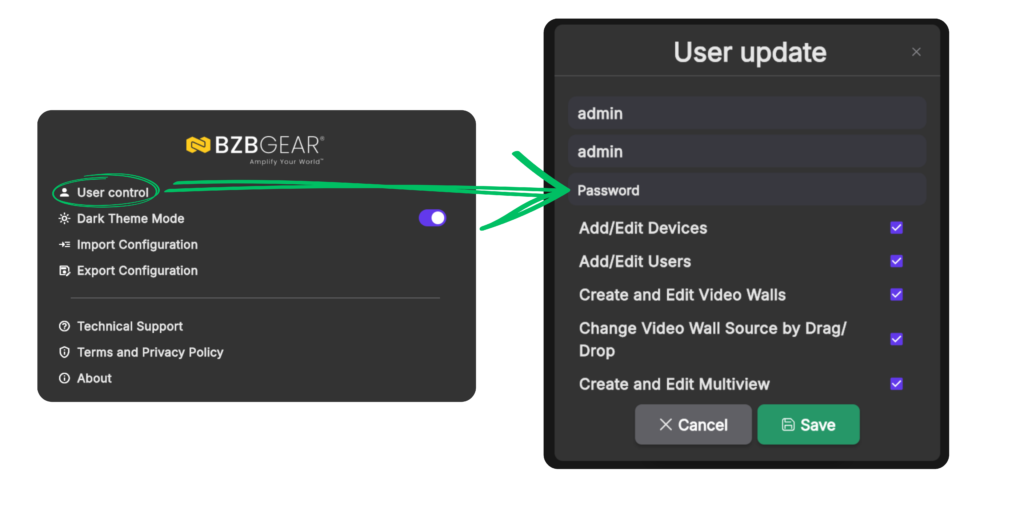
If the BZBGEAR Switch Control App will be used by an end user who should have limited control over the Matrix, use the App's permission settings to restrict access to the functions they need.
Depending on the Matrix and App capabilities, permissions can be configured to provide access to functions such as:
- Preset recall only
- Basic Matrix switching
- Other available control functions
This allows the system administrator or installer to complete the full configuration through the Web GUI while giving end users a simplified interface with only the controls they need.
Recommended Workflow
For the most reliable setup, we recommend following this order:
Web GUI → Test System → Label Inputs/Outputs → Create & Label Presets → Add Matrix to App → Rename Presets → Test Presets → Configure User Permissions
Keeping the Web GUI as the primary configuration interface helps ensure that the Matrix is fully configured before the App is introduced for day-to-day control.


8.00 a.m. - 5.00 p.m. (PST)
10.00 a.m. - 3.00 p.m. (PST)
(by appointment only)
