







How to Manage Multiple BZBGEAR Cameras in OBS Studio
OBS Studio allows you to connect multiple BZBGEAR cameras, switch between camera angles, display multiple feeds, and record or live stream events from one workstation.
This guide covers connecting cameras through NDI or RTSP, organizing camera feeds into scenes, and managing a multi camera production.
1. Connect Cameras to the Network
Before adding cameras to OBS:
- Connect each camera's LAN port to a network switch or router
- Connect the computer running OBS to the same network, preferably through Ethernet
- Power on the cameras and confirm each has a valid IP address
- If applicable, open the BZBGEAR PTZ Camera Control App and verify that each camera responds to pan, tilt, and zoom commands
2. Add Cameras Using NDI
For BZBGEAR cameras that support NDI, video can be transmitted directly over the network without a separate capture device.
Enable NDI on Each Camera
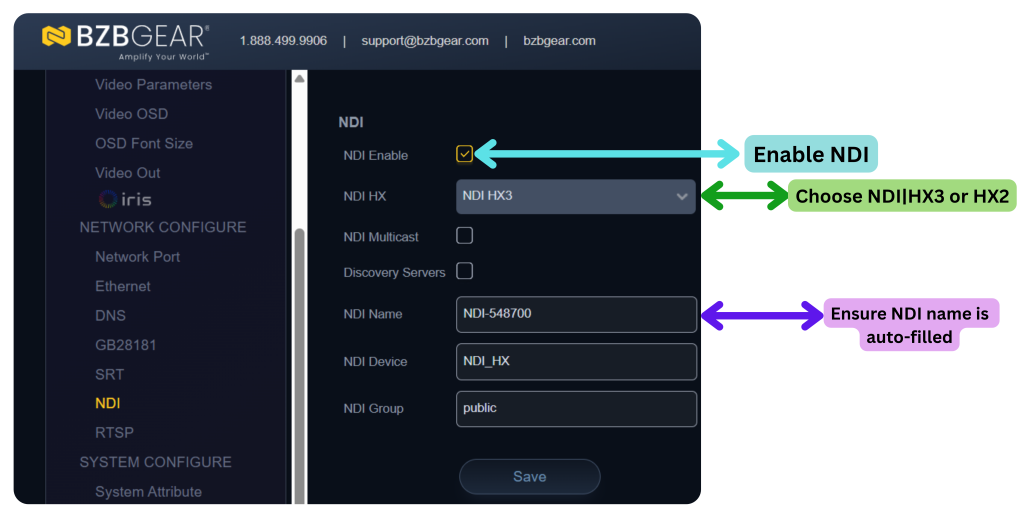
- Enter the camera's IP address into a web browser
- Log in and navigate to the NDI configuration page
- Confirm that NDI is enabled and that the camera has a unique NDI name
- Save any changes and reboot if required
Repeat for each camera.
Tip: Use descriptive names such as Camera 1 - Front or Camera 2 - Side to make feeds easier to identify in OBS.
Add NDI Sources to OBS
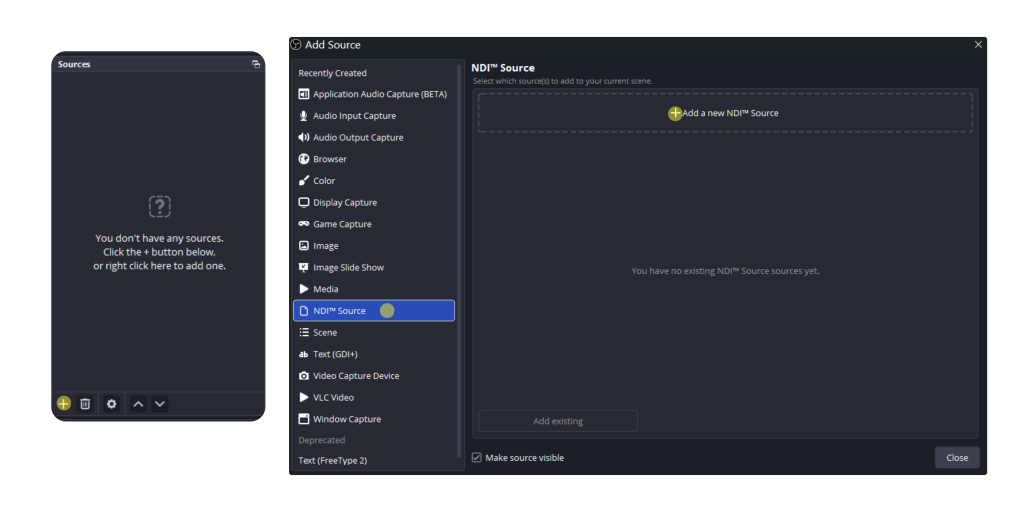
- Open OBS Studio and create a new scene using the + button under Scenes
- Under Sources, click + and select NDI Source
- Name the source and open its properties
- Select the corresponding camera from the NDI source dropdown
- Click OK to add the feed
Repeat for each camera.
Note: NDI availability and configuration options vary by camera model. You may need an NDI integration or plugin installed in OBS.
3. Add Cameras Using RTSP
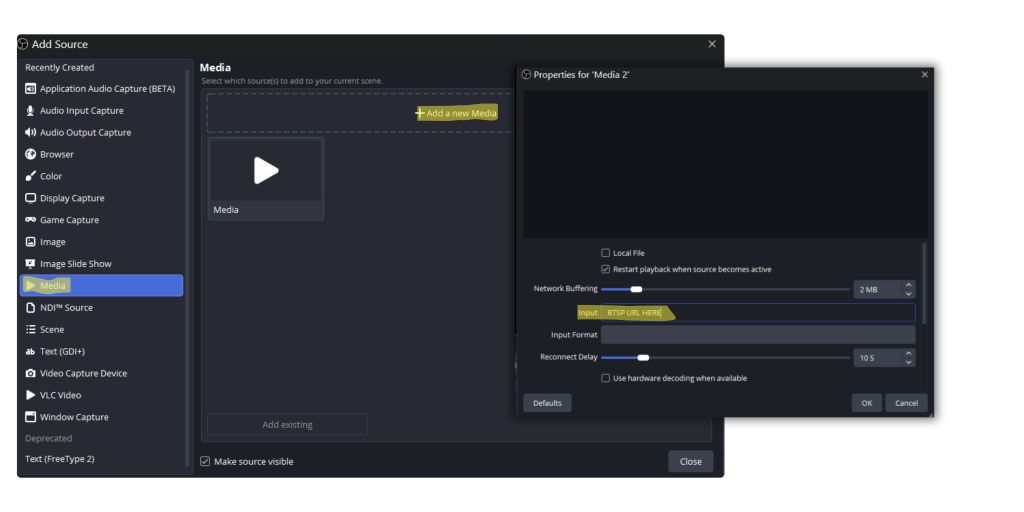
Compatible BZBGEAR cameras can also be added through RTSP using OBS's Media Source.
- Select a scene and click + under Sources
- Select Media Source and enter a name
- Uncheck Local File
- Enter the camera's RTSP URL in the Input field
Example: rtsp://<camera-IP>:554/live/av0
Replace <camera-IP> with the camera's actual IP address. The RTSP address and stream path may vary by model.
- Click OK and allow the stream a few seconds to connect.
Repeat for each additional camera.
Recommended Setting: RTSP Over TCP
For improved stream reliability, configure OBS to receive RTSP over TCP instead of UDP. This can help reduce video artifacts caused by packet loss.
- Open the RTSP source's Properties.
- Scroll to FFmpeg Options.
- Enter: rtsp_transport=tcp
- Click OK and allow the stream to reconnect.
Repeat for each RTSP source.
4. Organize Multiple Cameras in OBS
There are two common ways to organize camera feeds.
Option A: Separate Scenes
Create a separate scene for each camera. Add the corresponding NDI or RTSP source to each scene.
For example:
- Camera 1 – Main angle
- Camera 2 – Side angle
- Camera 3 – Wide shot
Selecting a scene switches the active camera angle.
Option B: Multiple Cameras in One Scene
Add multiple NDI or RTSP sources to the same scene. Resize and reposition each feed to create layouts such as:
- Side by side camera views
- Multi camera grids
- Picture in picture layouts
This is useful for interviews, presentations, and panel discussions.
5. Configure Camera Transitions (Available with Scenes)
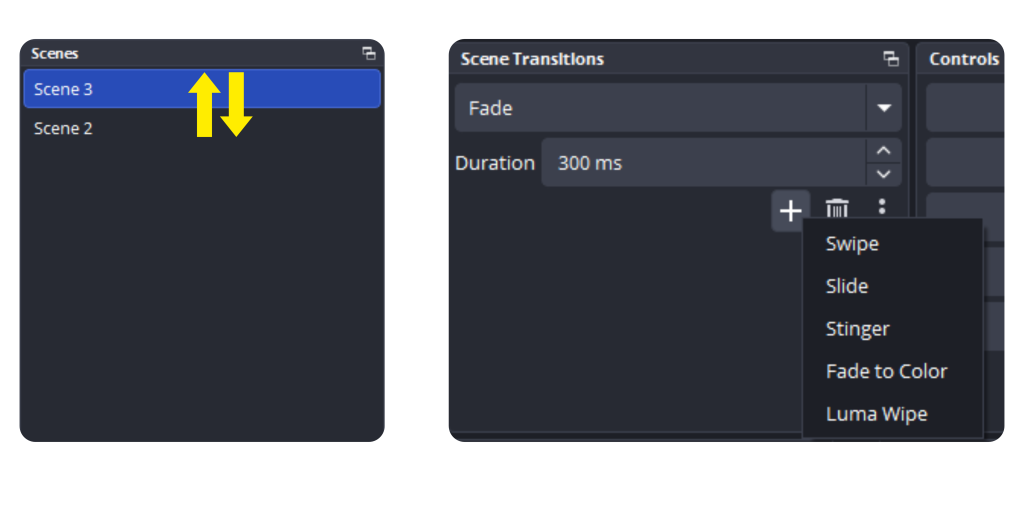
OBS includes built in transitions for switching between scenes.
- Locate the Scene Transitions panel
- Select a transition type
- Adjust the transition duration
- Switch between scenes to test the effect
Common transitions include:
- Cut: Immediately switches between camera angles
- Fade: Gradually transitions between scenes
- Swipe: Moves one scene across the screen to reveal another
6. Record or Live Stream an Event
Before starting, verify the following:
- All cameras are connected and responding to PTZ commands
- Each camera feed displays correctly in OBS
- Scenes and transitions work as expected
- The correct audio source is selected
- The recording location and available storage are confirmed
Recording
- Select the starting camera scene
- Click Start Recording in OBS
- Switch between scenes as needed during the event
- When finished, click Stop Recording
- Open the saved file to verify playback
Important: Switching scenes changes the active production output. It does not automatically create separate recordings for each camera. Individual camera recordings require a separate recording workflow or multi output solution.
Live Streaming
- Open Settings in OBS and select Stream
- Choose your streaming platform or configure a custom destination
- Enter the required server information and stream key
- Click Apply and OK
- Select your starting scene and click Start Streaming
You can switch camera angles, use transitions, and control supported PTZ cameras throughout the broadcast.


8.00 a.m. - 5.00 p.m. (PST)
10.00 a.m. - 3.00 p.m. (PST)
(by appointment only)
