





How to Display RTSP Streams on an HDMI Monitor with the BG-STREAM-D
Not every camera is NDI or Dante enabled — but nearly all of them can put out an RTSP stream. The good news is you don't need a computer running in the background to view that stream on a display. This guide walks you through using the BG-STREAM-D to take an RTSP network stream and convert it into an HDMI signal for a local monitor.
The BG-STREAM-D is a versatile decoder. It can take multiple streaming protocols — NDI, Dante, SRT, RTSP, and more — and convert them to HDMI for a local display, all through its own built-in web interface. That means you don't have to worry about handling conversions on your computer. If you just want to get a stream onto your local monitor, this little device will do it for you. For this walkthrough, we're focusing on pulling the RTSP stream built into a camera and sending it to an HDMI display.
Let's break it down.
What You'll Need
Before you start, make sure you have the following ready:
- The BG-STREAM-D decoder
- A camera with an RTSP stream (for this demo, we're using a BG-ADAMO 4K camera — it's a straight 4K HDMI camera, not NDI or Dante enabled, but like all BZBGEAR cameras it has a built-in RTSP stream)
- A network switch and your local network (both the camera and the decoder are PoE and DHCP-enabled, so they power over Ethernet and grab a local IP automatically — no extra power supplies needed)
- A computer connected to the same local network
- A monitor or display with an HDMI input
- An HDMI cable to connect the decoder to your display
- Your camera's RTSP stream address (you'll find it in the camera's manual)
The key thing to remember: every device — the camera, the decoder, and your computer — needs to be on the same local network so they can talk to each other.
Part 1: Connect Everything to the Network
Step 1: Get your camera online
Connect your camera to your network switch. If you're using the BG-ADAMO 4K, PoE handles both power and the network connection over a single ethernet cable, and DHCP (when enabled) assigns it a local IP address automatically.
Step 2: Connect the BG-STREAM-D to the network
Plug the BG-STREAM-D into the same network switch. It's PoE as well, so it powers over ethernet and grabs its own local IP from your DHCP network — nice and easy setup.
Step 3: Connect the decoder to your display
Run an HDMI cable from the HDMI OUT on the BG-STREAM-D to your monitor.
Step 4: Put your computer on the same network
Connect your computer (wireless or directly to the same switch) to the local network. You'll use it to log into the decoder's web interface and enter your RTSP stream.
Part 2: Log In to the BG-STREAM-D Web GUI
Step 1: Find the decoder's IP address
Since the BG-STREAM-D is DHCP-enabled, it will apply a local IP address right on your network. Run a simple network scan to find it — most scanning tools will list the device so you can grab its IP. In our demo, the decoder came up at 192.168.30.142 (yours will differ depending on your network).

Step 2: Open the web interface
Type the decoder's IP address into your web browser's address bar and hit Enter.
Step 3: Log in
Enter the default credentials:
- Username: admin
- Password: 0000
Hit login, and you're in.
Part 3: Set Up Your Display Output
Step 1: Open the Monitor settings
The BG-STREAM-D has an HDMI out that recognizes your connected monitor. Head to the monitor/output settings to confirm everything looks good before you start the stream.
Step 2: Use Auto output resolution
We recommend setting the output to Auto — the decoder will detect and match the resolution your monitor supports. Hit Apply and give it a moment to refresh. In our demo, the connected monitor supports up to 4K at 60fps.

Part 4: Enter the RTSP Stream
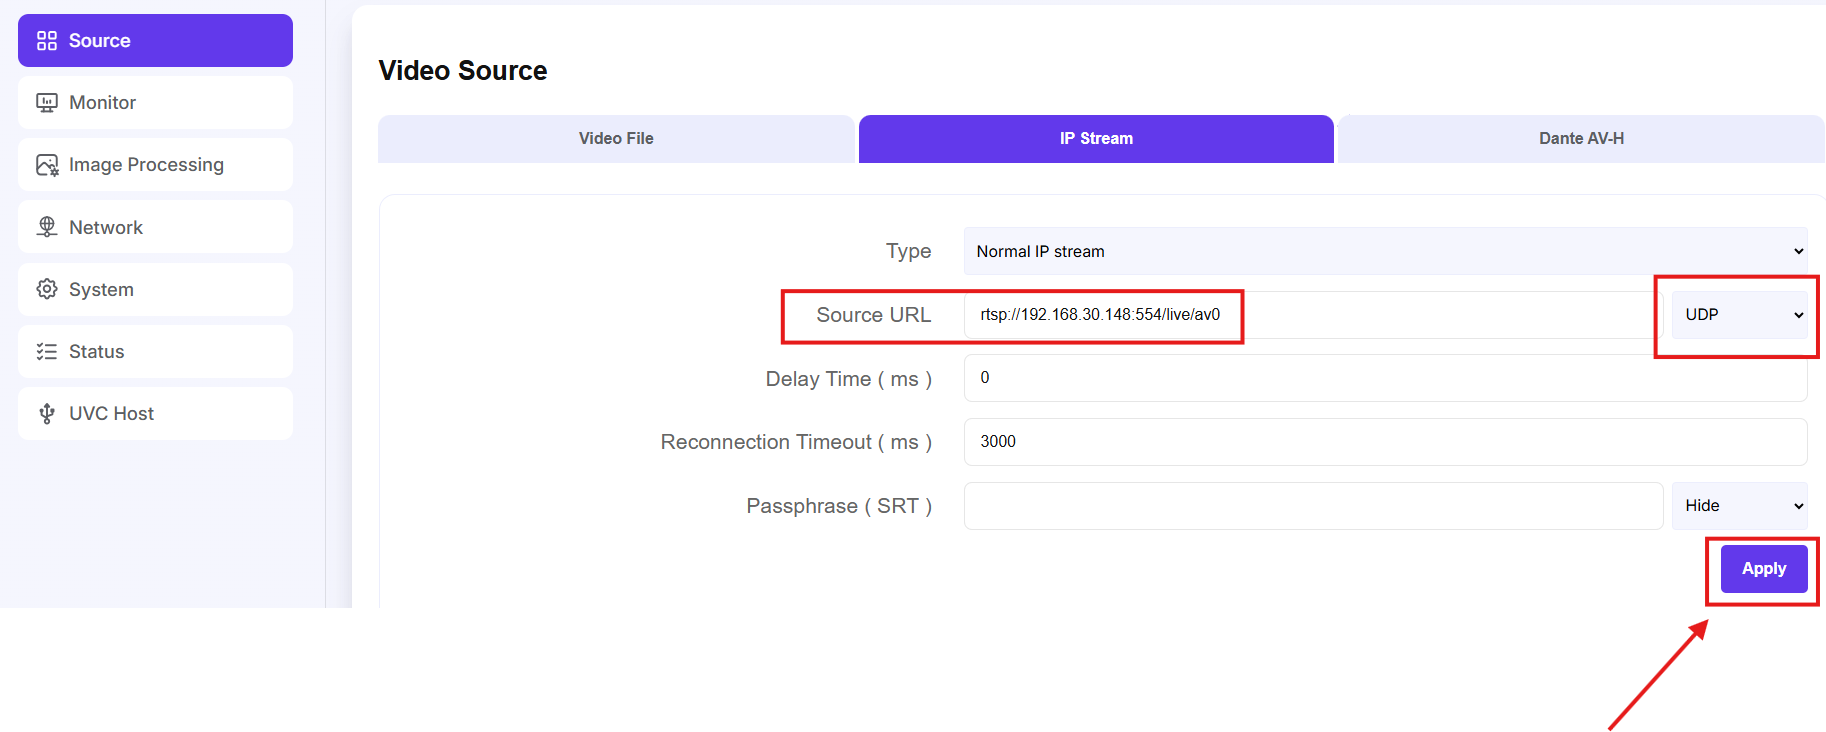
Step 1: Open the Source tab and select IP Stream
The first tab in the web interface is your Source tab, where you choose what to decode. You'll see options for a video file, an IP stream, and Dante. For RTSP, select the IP stream option.
Step 2: Paste in your RTSP address
Find your camera's RTSP stream address in its manual — it will include the camera's local IP — and paste it into the IP stream field. Double-check that it's entered correctly.
Step 3: Choose your transport and apply
Set the transport protocol to UDP, then click Apply. After a moment, the RTSP stream from your camera pops right up on the monitor.
That's it — the RTSP stream is now converted through the decoder and onto your HDMI display. Keep in mind you'll usually see a couple-second delay, which is normal for an RTSP stream, but in practice it's not bad at all.
Part 5: Fine-Tune and Explore Your Options
With your stream up, the web interface gives you a few more things to work with.
Embedded audio. Under the audio source, the option is embedded audio, which passes right through the HDMI along with the video.
Adjust the image parameters. If you'd like to tweak how the picture looks on your monitor, you can adjust the image parameters here.
Network settings. The network page is straightforward — you can keep DHCP on or assign a static IP if your setup calls for it.
System settings. You'll also find system options here, including factory reset, firmware updates, and username/password management, plus a status page that shows what you're currently streaming.
That's How Simple It Is
Even a camera that isn't NDI or Dante enabled can land on a physical display without a computer doing the conversion. With the BG-STREAM-D, it comes down to getting everything on the same network, logging in, setting your output, and pasting in the RTSP stream. It's a simple, reliable way to get an RTSP camera onto an HDMI monitor.


8.00 a.m. - 5.00 p.m. (PST)
10.00 a.m. - 3.00 p.m. (PST)
(by appointment only)