





How to Decode an NDI Stream to HDMI with the BG-STREAM-DE
NDI is fantastic for moving video around a network, but eventually you'll want that stream on a real monitor. This guide walks you through using the BG-STREAM-DE to take an NDI camera off your network and decode it into an HDMI signal for a local display.
The BG-STREAM-DE is a versatile stream encoder and decoder. As a decoder, it takes a network protocol like NDI, Dante, or RTSP and extracts it out to an HDMI monitor — no computer needed to run the conversion. It also handles line-in audio embedding and audio extraction, and it can even record to a USB drive, but all the magic happens inside its web interface. For this walkthrough, we're focusing on taking an NDI camera and decoding it to a monitor.
Let's break it down.
What You'll Need
Before you start, make sure you have the following ready:
- The BG-STREAM-DE encoder/decoder
- An NDI source on your network (for this demo, we're using a BG-ADAMO JR NDI camera)
- A network switch and your local network (the BG-STREAM-DE is PoE-powered and DHCP-enabled, so it powers over Ethernet and grabs a local IP automatically)
- A computer connected to the same local network
- A monitor or display with an HDMI input
- An HDMI cable to connect the unit to your display
The key thing to remember: every device — the camera, the unit, and your computer — needs to be on the same local network so they can talk to each other.
Part 1: Connect Everything to the Network
Step 1: Get your NDI source online
Connect your NDI camera to your network switch so its stream is available on the network.
Step 2: Connect the BG-STREAM-DE to the network
Plug the BG-STREAM-DE into the same network switch. It's PoE-powered, so a single Ethernet cable handles both power and the network connection, and DHCP assigns it a local IP address automatically.
Step 3: Connect the unit to your display
Run an HDMI cable from the HDMI OUT on the BG-STREAM-DE to your monitor. Until you make the connection in the web interface, the monitor will simply read "no signal."
Step 4: Put your computer on the same network
Connect your computer to the local network. You'll use it to log into the web interface and select your source.
Part 2: Log In to the BG-STREAM-DE Web GUI
Step 1: Find the unit's IP address
The BG-STREAM-DE is DHCP-enabled out of the box, so it grabs a local IP as soon as it's on your network — just run a simple network scan to find it. The current IP address will also display for a brief moment on the local connected monitor after a reboot. For our example, the ip address of our BG-STREAM-DE is 192.168.30.141. The IP address of your device will be different depending on your network setup.
Step 2: Open the web interface
Type the unit's IP address into your web browser's address bar and hit Enter.
Step 3: Log in
Enter the default credentials:
- Username: admin
- Password: 0000
Hit login, and you're in.
Part 3: Select Your NDI Source
Step 1: Open the source/decode page
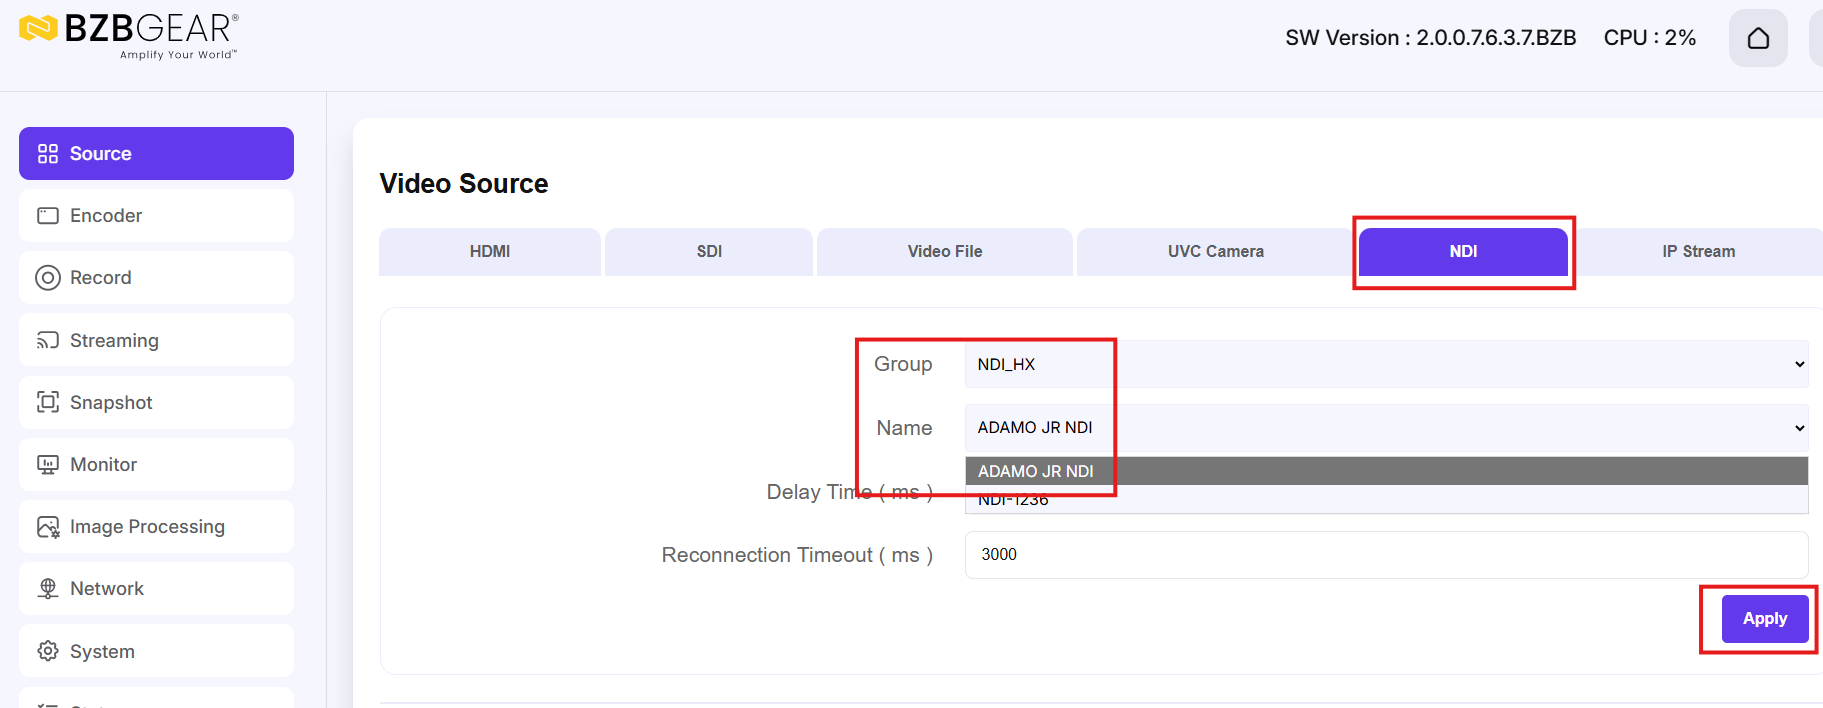
The first page in the web interface is where you tell the unit what you want to send to the monitor — an HDMI source or any of your network protocols like NDI or Dante. This is the page you use to decode a stream onto your display.
Step 2: Choose your NDI camera
Go to the NDI tab. Under the NDI-HX group you'll see all the NDI cameras currently on your network. Pick the one you want to send to the monitor — labeling your sources ahead of time makes the right one easy to spot.
Step 3: Apply
Hit Apply, and right away the unit takes the NDI feed and displays it on your connected monitor. That's how simple it is:
Part 4: Switch Between Sources
One of the handy things about the BG-STREAM-DE is that you can flip between inputs like a little switcher. If you want to jump from your NDI feed back to the HDMI input, just select HDMI and hit Apply — the unit switches the source on the monitor. Select NDI and apply to switch back. It's an easy way to toggle between cameras or sources on the fly.


8.00 a.m. - 5.00 p.m. (PST)
10.00 a.m. - 3.00 p.m. (PST)
(by appointment only)