







How to Decode a Dante Video Source to HDMI with the BG-STREAM-DE
Dante is a powerful way to move audio and video around a network, but eventually you'll want that feed on a real monitor. This guide walks you through using the BG-STREAM-DE to take a Dante-enabled camera off your network and decode it into an HDMI output for a local display.
The BG-STREAM-DE is a true encoder and decoder. As a decoder, it takes a network protocol like Dante, NDI, or RTSP and extracts it out to an HDMI monitor — no computer needed to run the conversion. It also supports audio embedding and extraction and even has an SDI input, but all the magic happens inside its web interface. For this guide, we're focusing on decoding a Dante camera to a monitor. (We assume you're already familiar with Dante if you're reading this.)
Let's break it down.
What You'll Need
Before you start, make sure you have the following ready:
- A BG-STREAM-DE encoder/decoder
- A Dante-enabled source on your network (for this demo, we're using a BG-ADAMO 4k Dante camera)
- A network switch and your local network (the BG-STREAM-DE is DHCP-enabled out of the box, so it grabs a local IP automatically)
- A computer connected to the same local network, with Dante Controller installed
- A monitor or display with an HDMI input
- An HDMI cable to connect the unit to your display
The key thing to remember: every device — the camera, the unit, and your computer — needs to be on the same local network so they can talk to each other.
Part 1: Connect Everything to the Network
Step 1: Get your Dante source online
Connect your Dante camera to your network switch so its stream is available on the network. In our demo, the Dante feed from the BG-ADAMO 4k. is already enabled and live.
Step 2: Connect the BG-STREAM-DE to the network
Plug the BG-STREAM-DE into the same local switch. It's DHCP-enabled out of the box, so it automatically pulls a local IP address — nice and easy.
Step 3: Connect the unit to your display
Run an HDMI cable from the HDMI OUT on the BG-STREAM-DE to your monitor.
Step 4: Put your computer on the same network
Connect your computer (wired or through the same switch) to the local network. You'll use it to log into the web interface and to make the subscription in Dante Controller.
Part 2: Log In to the BG-STREAM-DE Web GUI
Step 1: Find the unit's IP address
Since the BG-STREAM-DE is DHCP-enabled, it pulls a local IP as soon as it's on your network. There are two easy ways to find it: run a network scan, or simply reset the unit with a monitor connected — the new IP address will display right on the screen. In our demo, the unit came up at 192.168.30.139 (yours will likely be different on your network).
Step 2: Open the web interface
Type the unit's IP address into your web browser's address bar and hit Enter.
Step 3: Log in
Enter the default credentials:
- Username: admin
- Password: 0000
Hit login, and you're in.
Part 3: Set Your Source to Dante
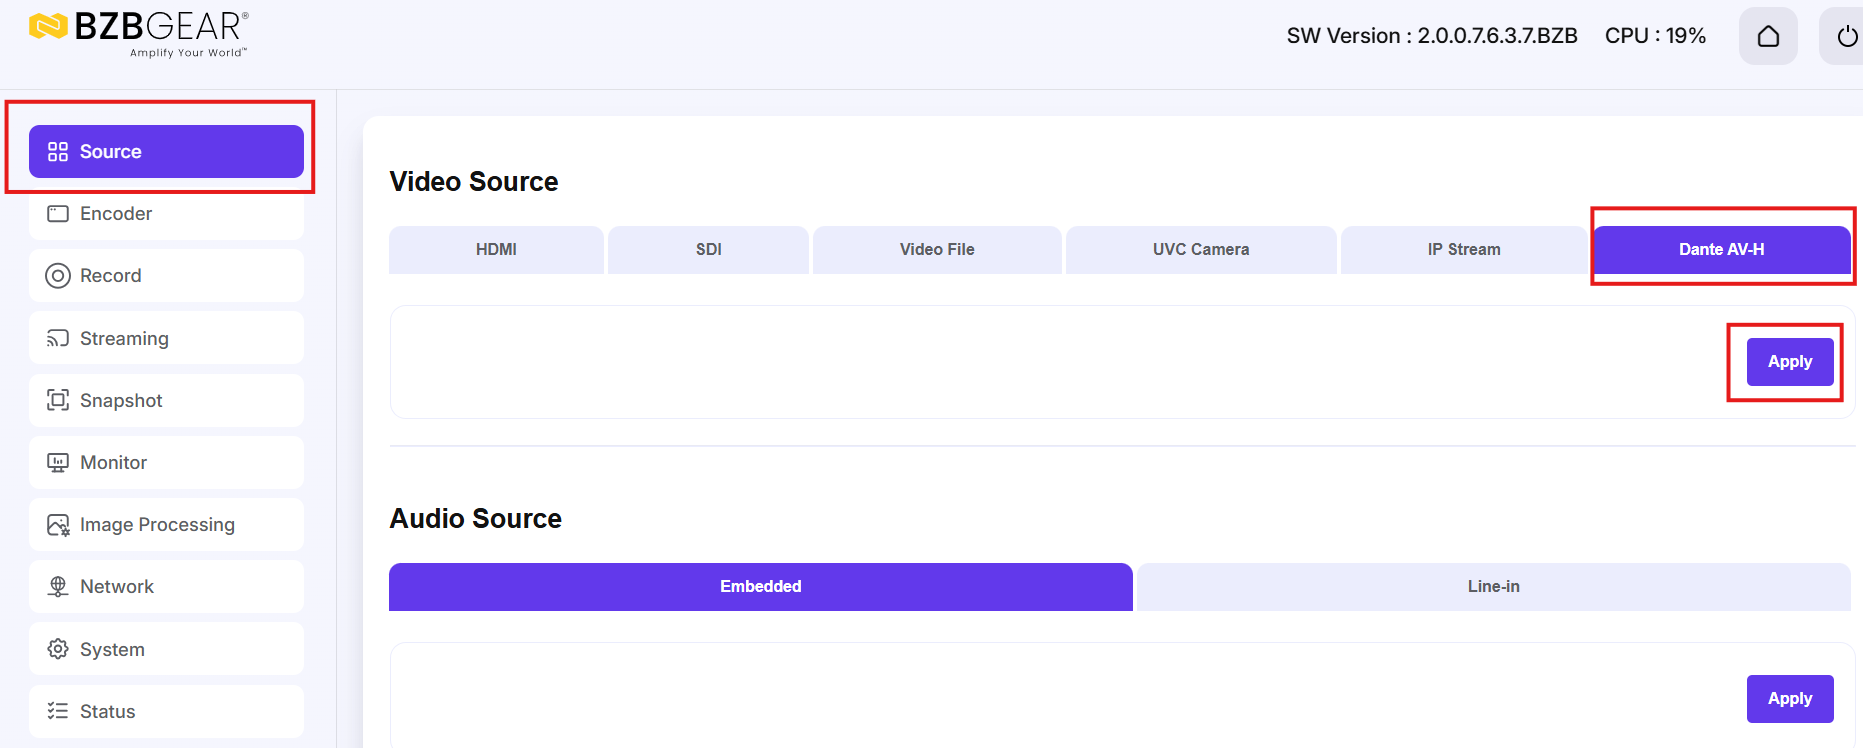
The first tab in the web interface is where you choose the source you want to encode or decode. To decode your Dante camera, select the Dante feed tab— this tells the unit, "my input source is the Dante-enabled camera on the network, and I want to decode it."
Hit Apply. The unit will ask to reboot to apply the change — let it restart, and your source is now set to Dante.
Part 4: Create the Subscription in Dante Controller
Step 1: Open Dante Controller
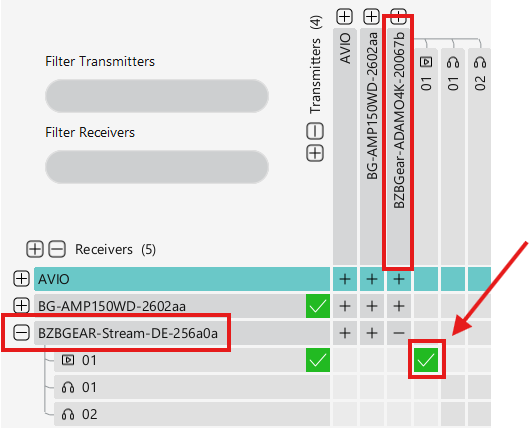
Once the unit is back up, open Dante Controller on your computer. At first the BG-STREAM-DE may show as unsubscribed — that's completely normal until you make the connection.
Step 2: Make the subscription
In the routing grid, subscribe your Dante-enabled camera video feed (the transmitter) to the BG-STREAM-DE video decoder (the receiver feeding your monitor). When the subscription takes, you'll see green check marks confirming it's active.
Step 3: Confirm the feed on your monitor
With the subscription made, the Dante feed is brought into the unit and exported out to your HDMI monitor. That's it — you've taken a Dante camera and put it on a local display. Very simple.


8.00 a.m. - 5.00 p.m. (PST)
10.00 a.m. - 3.00 p.m. (PST)
(by appointment only)