







How to Convert Dante AV-H to HDMI with the BG-STREAM-D
Dante has become one of the go-to protocols for moving audio and video around a network, but eventually that stream needs to show up on a real display. This guide walks you through using the BG-STREAM-D to take a Dante camera off your local network and decode it into an HDMI output you can connect straight to a monitor.
The BG-STREAM-D is a versatile decoder. It can pull in different streaming protocols —from a Dante enabled camera, to a camera's RTSP stream— and extract that feed into a clean HDMI signal so you can display it locally instead of only viewing it on a computer. For this walkthrough, we're focusing on the Dante side of things: taking a Dante-enabled camera like our BG-ADAMO-4KDA. and converting it into an HDMI feed. It's very point A to point B — connect everything up and let the decoder do the work.
Let's break it down.
What You'll Need
Before you start, make sure you have the following ready:
- A BG-STREAM-D decoder (needs to be activated via Dante Controller)
- A Dante-enabled source on your network (for this demo, we're using the BG-ADAMO-4KDA Dante camera)
- A network switch and your local network (both the camera and the decoder are PoE and DHCP-enabled, so they will power over Ethernet and grab a local IP automatically — no extra power supplies)
- A computer connected to the same local network, with Dante Controller installed
- A monitor or display with an HDMI input
- An HDMI cable to connect the decoder to your display
The key thing to remember: every IP device — the camera, the decoder, and your computer — needs to be on the same local network so they can talk to each other.
Part 1: Log In to the BG-STREAM-D Web GUI
Step 1: Find the decoder's IP address
Since the BG-STREAM-D is DHCP-enabled, you'll need to find the IP address it was assigned. The easiest way is a quick local network scan — most scanning tools will list the device by its MAC address. If you're familiar with Dante, you can also see the unit's IP address right in Dante Controller. In our demo, the decoder came up at 192.168.30.141 (yours will most likely be different on your network).

Step 2: Open the web interface
Type the decoder's IP address into your web browser's address bar and hit Enter.
Step 3: Log in
Enter the default credentials:
- Username: admin
- Password: 0000
Hit login, and you're in.
Part 2: Enable the Dante Source
Step 1: Open the Source tab
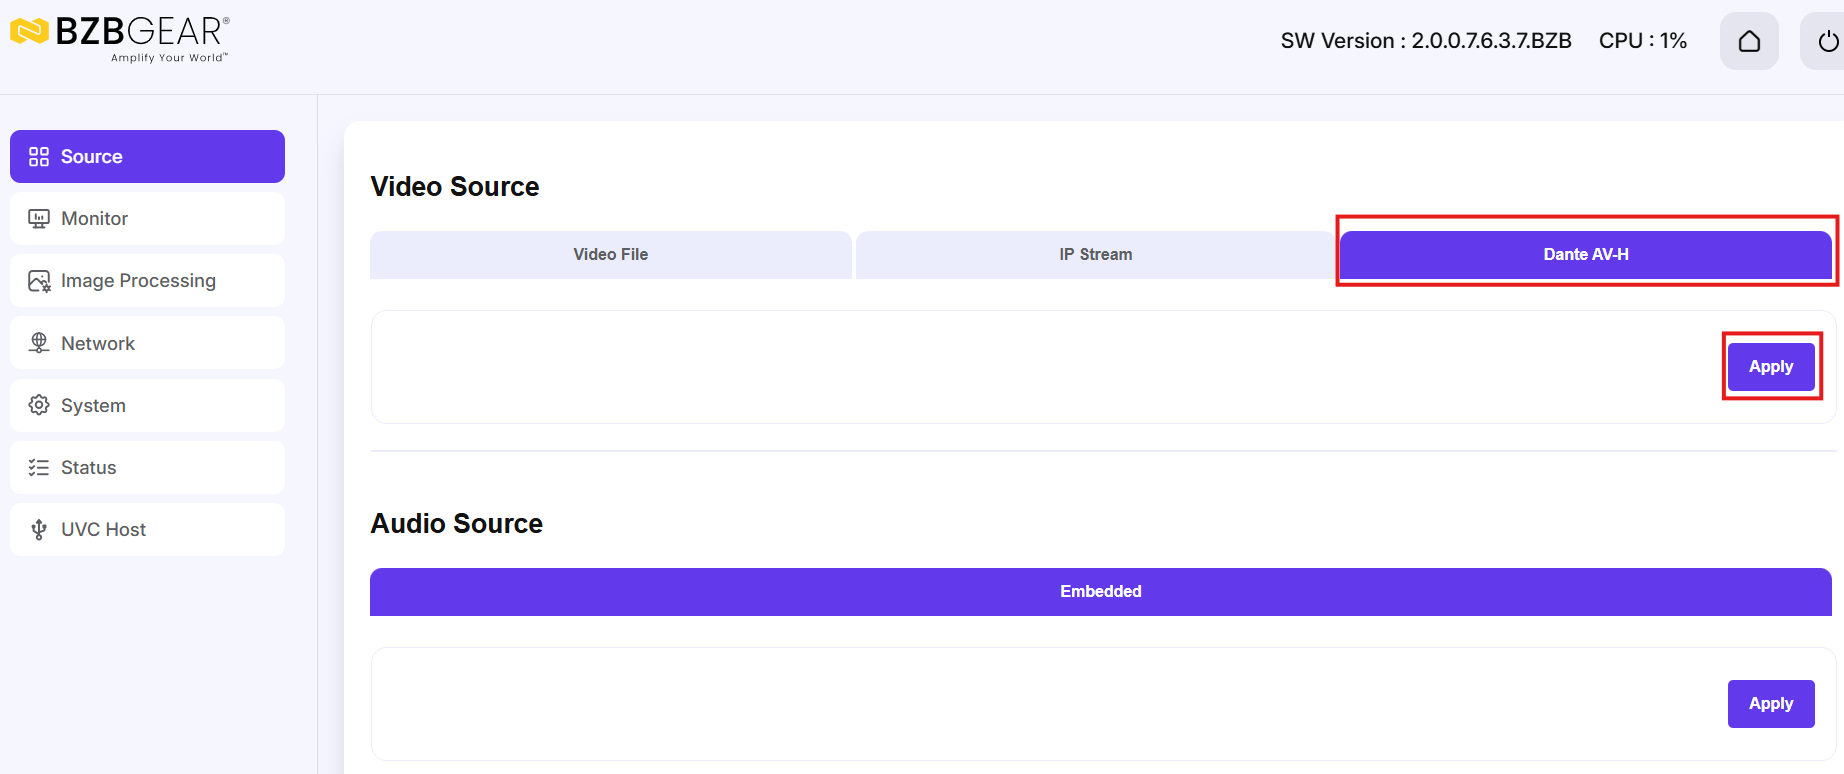
The first tab in the web interface is your Source tab. This is where you tell the decoder what you want to convert. The BG-STREAM-D can decode a video file connected to the unit, an IP stream (where you enter an RTSP stream), or Dante AV-H stream.
Step 2: Select Dante and apply
Choose Dante as your source and click Apply to enable it. Now it will be ready to use in Dante controller:
Part 3: Set Your Output and Review Settings
Step 1: Confirm the output resolution
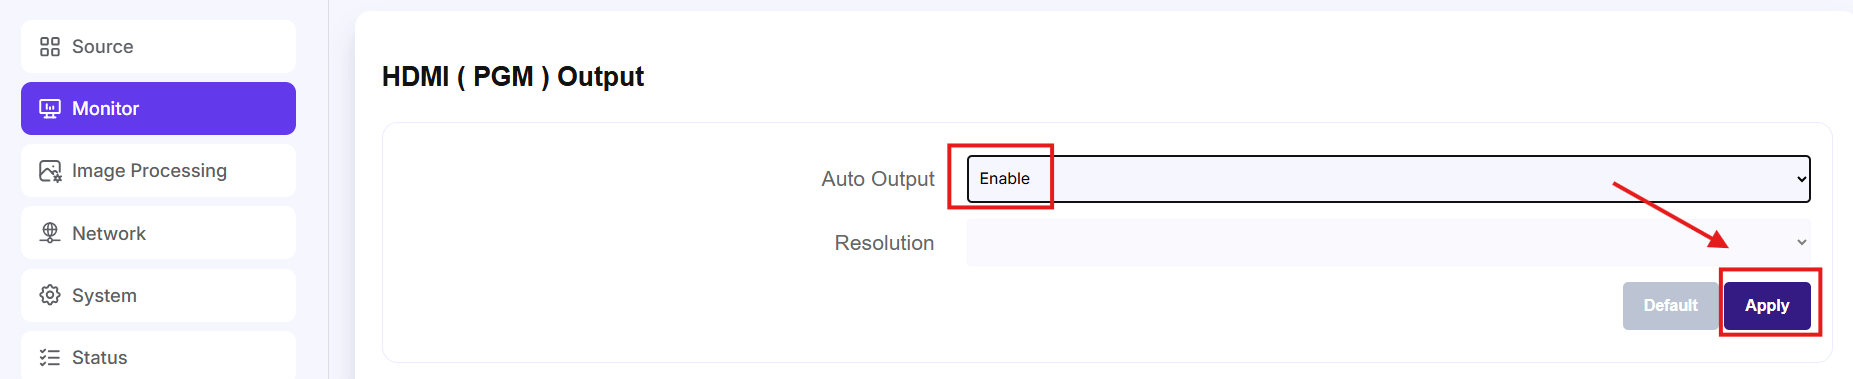
Head to the Monitor settings. What's great is that the BG-STREAM-D recognizes your connected monitor, so it can auto-adjust the resolution to the highest resolution your connected display supports. You can also set a static resolution if you prefer — for example, dropping it to 1080p if your monitor only supports that. We recommend leaving Auto on: hit enable, hit Apply, and it will lock in the right resolution for your display.
Step 2: Explore the extra settings
While you're here, the web interface gives you plenty more to work with: image processing (to adjust the image parameters on your monitor), plus network settings, system settings, firmware updates, factory reset, and user management. The status page is worth a look too — it should show your video source listed as Dante, confirming the decoder is set correctly.
Part 4: Create the Subscription in Dante Controller
Step 1: Open Dante Controller
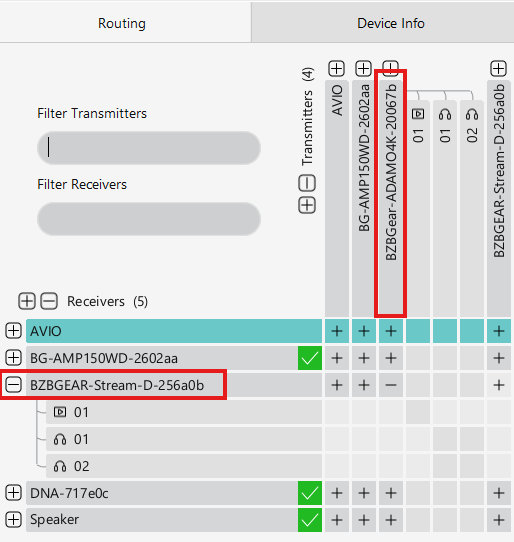
Switch over to Dante Controller on your computer. You should see your Dante devices listed, the BG-ADAMO 4K. shows up as a Dante transmitter, and the BG-STREAM-D now appears as a Dante receiver.
Step 2: Create the subscription
In the routing grid, click to create the subscription between the BG-ADAMO 4k. transmitter and the BG-STREAM-D receiver. Right away, the feed pops up on your monitor — and you'll see green check marks in Dante Controller confirming the subscription is active.
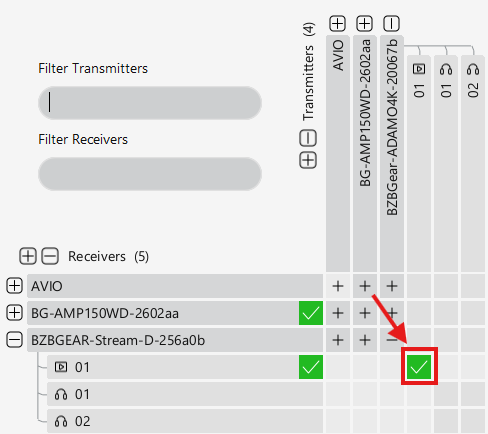
That's how simple it is. Turn on the stream, route it into HDMI, and there it is on the display. You can just as easily turn the subscription off and back on whenever you need to.
Part 5: Troubleshooting Tips
Dante is powerful, but it occasionally needs a moment to settle in. A couple of things worth keeping in mind:
Keep everything on the same network. This is the golden rule. If a device isn't showing up, double-check that the camera, decoder, and computer are all on the same local network.
Restart Dante Controller if things don't resync. If you've changed IP addresses — especially on a DHCP network — Dante can take a little bit to catch up. Restarting the controller usually gets everything to resync.
Reset the decoder after changing settings. Anytime you change settings in the stream decoder, you may need to reset it. You can do that through the web interface, or simply power-cycle it by unplugging the PoE and plugging it back in.


8.00 a.m. - 5.00 p.m. (PST)
10.00 a.m. - 3.00 p.m. (PST)
(by appointment only)