Guide to Using Luma and Chroma Key - BG-QUADFUSION-4K
Guide to Using Luma and Chroma Key
BG-QUADFUSION-4K Video Switcher
Video production switchers often use keying techniques to combine multiple video sources into a single output. Two common methods are Luma Key and Chroma Key. Both remove parts of an image to overlay one video source onto another, but they work in different ways.
1. Luma Key (Luminance Keying)
How It Works
- Removes areas of an image based on brightness (luminance) values.
- Typically, black or very dark areas are treated as transparent.
- The non-black parts remain visible and are overlaid on another video source.
Common Uses
- Adding logos, watermarks, or text graphics over live video.
- Inserting subtitles or scoreboards into a broadcast.
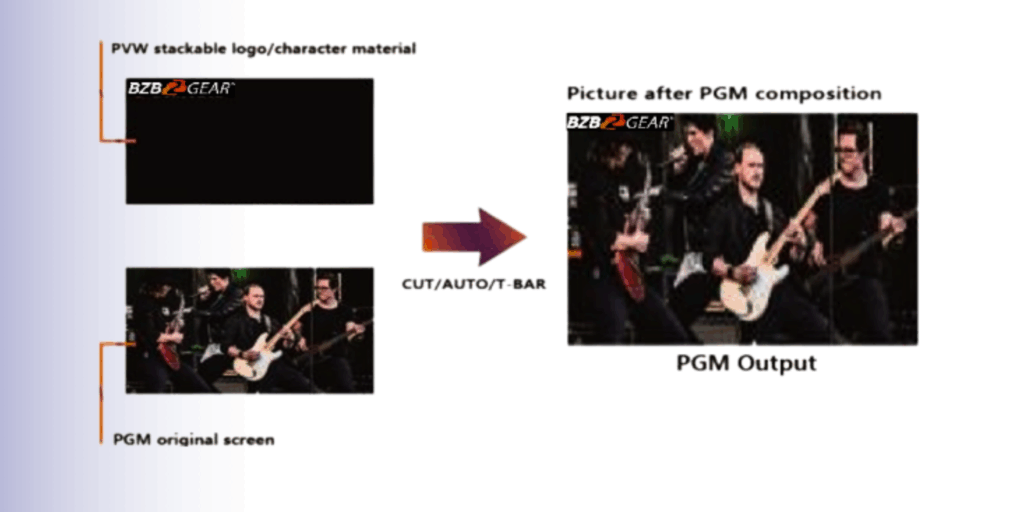
Example Workflow
- Prepare a graphic with a black background (logo, text, etc.).
- Load this graphic into the PVW (Preview) input.
- Set the keying mode to Luma.
- The switcher removes the black background, leaving only the visible content.
- The remaining image is overlaid onto the PGM (Program) output.
✅ Result: Your logo or text appears over the live video feed without a black box background.
2. Chroma Key (Color Keying)
How It Works
- Removes a specific color (commonly green or blue) from an image.
- The selected color becomes transparent, letting another video source show through.
Common Uses
- Creating virtual backgrounds (green/blue screen).
- Placing performers into custom environments.
- Producing effects like weather maps, stage sets, or digital scenery.
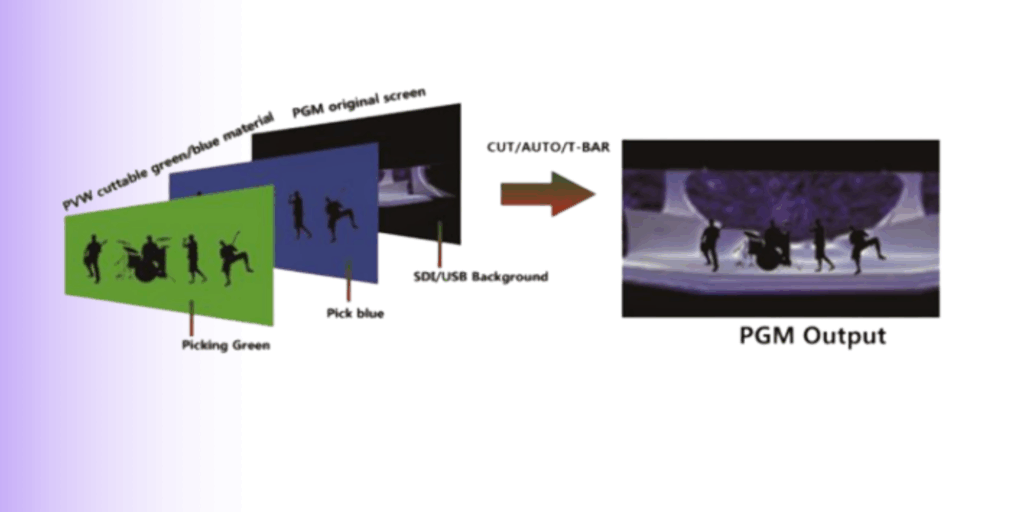
Example Workflow
- Record or feed a subject in front of a green or blue screen.
- Load this input into the PVW (Preview).
- Select Chroma Key and choose the color to remove (green or blue).
- Set another video source (virtual background, graphics, video loop) as the PGM (Program).
- The switcher removes the background and replaces it with the PGM source.
✅ Result: The subject appears as if standing in front of the new background.
3. Key Differences Between Luma and Chroma
|
Feature |
Luma Key |
Chroma Key |
|
Removal Based On |
Brightness (black/dark areas removed) |
Color (green/blue areas removed) |
|
Best For |
Logos, text, watermarks, simple overlays |
Green-screen effects, virtual sets |
|
Background Needed |
Black/dark background |
Solid green or blue screen |
4. Practical Tips
- Luma Key → Use high-contrast graphics (white/colored text on black background).
- Chroma Key → Ensure the background is evenly lit and shadow-free for clean removal.
- Fine-tune tolerance and edge softness settings on the switcher for best results.
5. Step-by-Step Instructions
A. Using Luma Key (Logos, Text, Watermarks)
- Prepare Your Source
- Use a graphic with a black background (logo, text, subtitle).
- Connect this source to one of the switcher inputs.
- Assign Source to PVW (Preview)
- Press the PVW button (1–4) that corresponds to your graphic input.
- Press the PVW button (1–4) that corresponds to your graphic input.
- Enable Luma Key
- Press the LUMA button in the FUNCTION section.
- The switcher removes the black background.
- Overlay on PGM Output
- Transition the keyed PVW onto the PGM (Program) output using:
- CUT (instant switch)
- AUTO (smooth transition)
- T-Bar (manual transition)
- Transition the keyed PVW onto the PGM (Program) output using:
✅ Result: The logo/text overlays seamlessly on your live program feed.
B. Using Chroma Key (Green/Blue Screen Effects)
- Set Up Your Chroma Source
- Record or feed a subject against a solid green or blue screen.
- Connect this source to one of the switcher inputs.
- Assign Source to PVW (Preview)
- Press the PVW button (1–4) for your keyed video input.
- Press the PVW button (1–4) for your keyed video input.
- Enable Chroma Key
- Press the CHROMA button in the FUNCTION section.
- Use the Menu + Arrow keys to select the background color (Green/Blue).
- Assign a Background
- Select your background source (video, image, virtual set) as the PGM input.
- Select your background source (video, image, virtual set) as the PGM input.
- Overlay the Keyed Subject
- Transition the keyed PVW onto the PGM output using CUT, AUTO, or T-Bar.
- Transition the keyed PVW onto the PGM output using CUT, AUTO, or T-Bar.
✅ Result: The subject appears naturally placed over the chosen background.
8.00 a.m. - 5.00 p.m. (PST)
10.00 a.m. - 3.00 p.m. (PST)
(by appointment only)