One of BZBGEAR’s newest devices in the joystick controller category is the Commander Jr. The Commander Jr is a compact joystick controller for PTZ cameras. This joystick has the same capabilities as our other joystick controllers, but comes in a smaller form. The smaller form provides a great deal of flexibility in regards to use, travel and application for smaller spaces. The ease of use and small form factor of this joystick PTZ camera controller also makes it accessible for educators as well.
What is a Joystick Controller?
BZBGEAR PTZ joystick controllers are good for any brand of PTZ camera. Our joystick controllers deliver precise control for both IP and serial PTZ cameras. PTZ joystick users can pan, tilt and zoom using the simple joystick. With the Commander Jr, users can control up to 5 cameras. This makes the Commander Jr perfect for small to medium scale productions. The quick select buttons on the Commander Jr enable users to instantaneously switch between cameras. To quickly access desired camera angles, users can simply set presets.
Controls for white balance, focus, iris and backlight settings allow users to make quick image adjustments. All settings information is displayed on the LED screen so the user knows what’s going on at all times. All-in-all, Joystick PTZ controllers are easy to use and very effective production/broadcasting tools.
The Commander Jr PTZ controller explained in depth

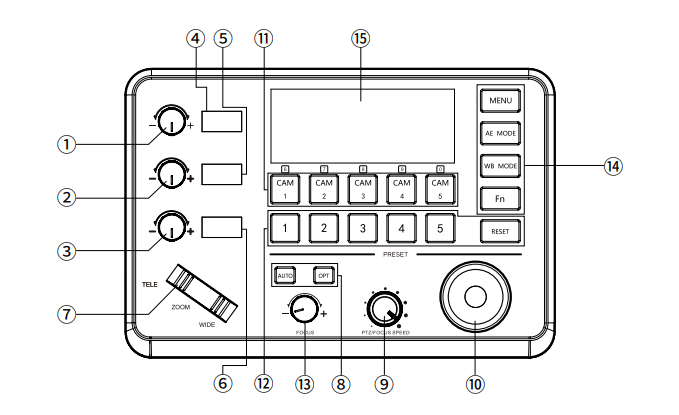
Implementing a joystick camera controller may be intimidating for some, due to the variety of controls that are available on a joystick. Although, when looking at the functions of each control individually, they are very simple. We will go through all 15 parts and briefly discuss their functions.
1- This Rotation Knob can be used to adjust the Camera Exposure Parameter or Red Gain Value. The three elements of camera exposure are aperture, shutter speed and ISO. Aperture is the width of your camera lens. The wider your aperture, the more light you let in. Shutter speed is how quickly your shutter opens and closes. When you have a faster shutter speed, less light will get in. ISO is basically your camera’s sensitivity to light. The red gain value lets you control how intense the red colors are in your image.
2- This Rotation Knob can be used to adjust the Camera Exposure Parameter or Blue Gain Value. Essentially, this knob does the same thing as knob 1, but instead it allows you to adjust the blue gain value.
3- The third knob basically allows you to adjust the camera exposure settings similar to the two knobs above.
4- This button enables you to adjust the LED Display, real-time display of items and parameter values. These settings are adjusted using knob 1.
5- This button enables you to adjust the LED Display, real-time display of items and parameter values. These settings are adjusted using knob 2.
6- This button enables you to adjust the LED Display, real-time display of items and parameter values. These settings are adjusted using knob 3.
7- This is the Zoom Bridge Key. The Zoom Bridge Key is used to zoom in and out. The zoom speed will change depending on the amount of pressure you apply when zooming in or out.
8- This section of buttons control the Focus Functions. When the Backlight of the [AUTO] Button is Lit up, that means the current focusing mode is in automatic mode. When the Backlight of the [AUTO] Button is Light Off, that means the Current Focus Mode is changed to Manual. Users can Press this button to switch the mode from automatic to manual.
9- This is the PTZ Speed Adjustment Knob. This knob is used to adjust the speed of the PTZ camera’s Pan, Tilt and Zoom, with a total of 7 gears. The current gear will be shown on the LED display so you know which gear the camera speed is in.
10- This is a 2-axis joystick. This joystick allows you to control your camera on a vertical axis and a horizontal axis. That’s up/down and left/right.
11- This is the Channel Button Zone. This is where you can manage presets and single out cameras to manage their settings.
12- This is the preset function zone. To set presets: Press and hold the number key for 2 seconds, such as [CAM 1], when the screen displays "Set Preset 1”, that means preset 1 has been saved)
13- This is the focus knob. This knob can be used to adjust the camera’s focus length.
14- This is the function key zone. The menu key is used to turn the camera menu on and off. Press and hold for 3 seconds and it will turn on the keyboard system Menu. The AE mode key is used to change the automatic exposure mode of the camera. Each time it is pressed, the camera changes to a different exposure mode. The WB mode key is used to change the White Balance of the camera. Each time it is pressed, the camera will be changed to different WB Mode. The FN key is reserved for adding custom functions.
15- Number 15 is the LED display. The LED display is used to display the current status information & Setting information of the keyboard in real time (including IP address, Port number, serial port address, communication protocol, Baud Rate and other information) The keyboard menu and the brightness of the display can be set through the keyboard menu as well.
Overall, the Commander Jr PTZ joystick controller is perfect for houses of worship, live events, studios and other broadcasting/production environments using PTZ cameras. To learn more about the Commander Jr, visit: bzbgear.com.


