How to Connect the BZ-MVS4X4-4K or BZ-MVS8X8-4K to the PC Control Software
In this article we will be going over how to successfully connect the BZ-MVS4X4-4K or BZ-MVS8X8-4K to the PC control software for full operation and functionality.
First, download the PC control software (Windows only) here.
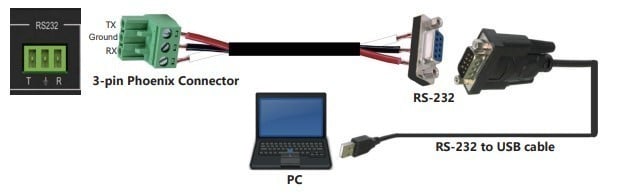
There are two ways to connect this unit to the PC control software (RS-232 and LAN):
 Once connected, confirm which USB com port the unit is using by going to your Device Manager window on your PC
In our example, it is connected to “COM33”:
Once connected, confirm which USB com port the unit is using by going to your Device Manager window on your PC
In our example, it is connected to “COM33”:
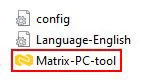
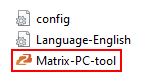
 From here, open the PC control software, "Matrix-PC-tool":
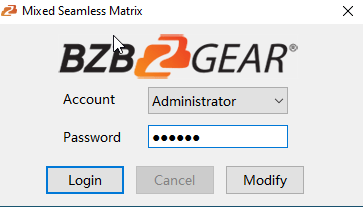
 Default password of Administrator is 111111:
 In the first tab “Matrix Switch”, follow these steps to connect:
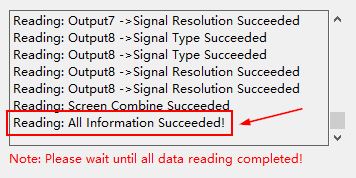
 Once the status box in the bottom right says “Reading: All Information Succeeded!”, you are officially connected:
 2. LAN Connection
Connect the PC and unit directly via the provided Ethernet cable:
2. LAN Connection
Connect the PC and unit directly via the provided Ethernet cable:
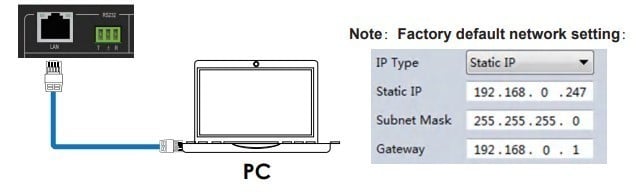 The computer must be on the same subnet as the unit to connect successfully, therefore the computer must be connected to the 192.168.0.x subnet. We can achieve this via the Local Area Network Properties on the computer.
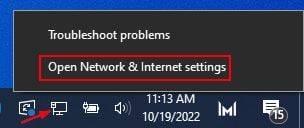
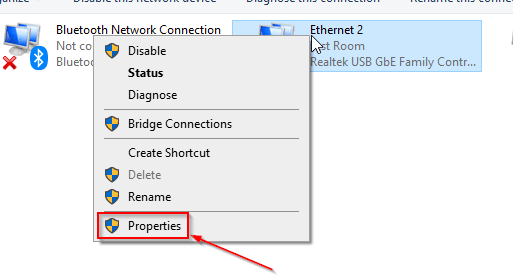
Right-click on the internet connection icon in the lower right corner of the desktop and select “Open Network & Internet Settings”:
The computer must be on the same subnet as the unit to connect successfully, therefore the computer must be connected to the 192.168.0.x subnet. We can achieve this via the Local Area Network Properties on the computer.
Right-click on the internet connection icon in the lower right corner of the desktop and select “Open Network & Internet Settings”:
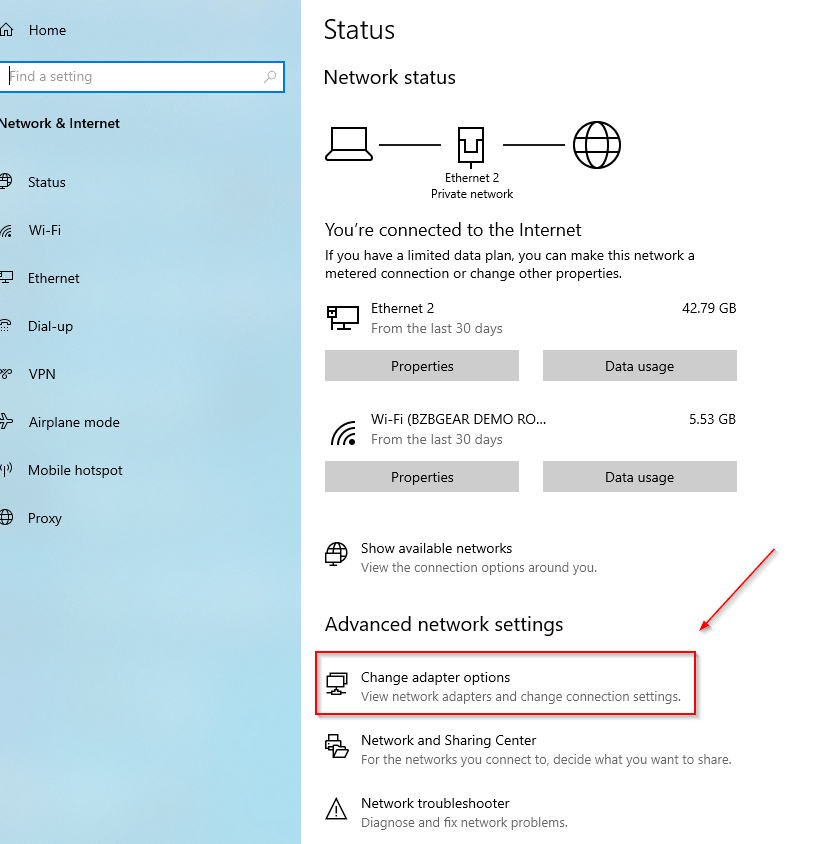
 Select “Change Adapter Options”:
 Right-click on your Ethernet connection and select “Properties”:
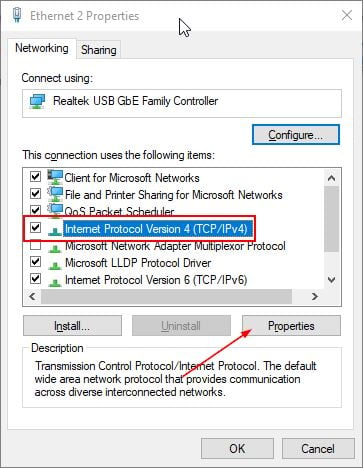
 Select “Internet protocol version 4 (TCP/IPv4)” as shown below and click “Properties”:
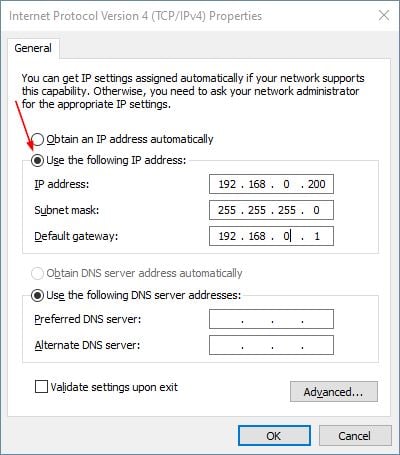
 Select the bubble “Use the following IP address”.
In the IP address field enter a non-conflicting IP address on the same subnet as the unit. In the example below we are using 192.168.0.200.
In the Subnet mask field enter 255.255.255.0. In the Default gateway field type 192.168.0.1. You can leave the DNS fields blank:
Select the bubble “Use the following IP address”.
In the IP address field enter a non-conflicting IP address on the same subnet as the unit. In the example below we are using 192.168.0.200.
In the Subnet mask field enter 255.255.255.0. In the Default gateway field type 192.168.0.1. You can leave the DNS fields blank:
 Click OK to apply your settings.
Click OK to close the network properties screen.
Open the PC control software, "Matrix-PC-tool":
Default password of Administrator is 111111:
In the first tab “Matrix Switch”, follow these steps to connect:
Click OK to apply your settings.
Click OK to close the network properties screen.
Open the PC control software, "Matrix-PC-tool":
Default password of Administrator is 111111:
In the first tab “Matrix Switch”, follow these steps to connect:
 Once the status box in the bottom right says “Reading: All Information Succeeded!”, you are officially connected:
The unit is now officially connected to the PC control software for full operation and functionality. Have fun!
Once the status box in the bottom right says “Reading: All Information Succeeded!”, you are officially connected:
The unit is now officially connected to the PC control software for full operation and functionality. Have fun!
- 1. RS-232 control
Once connected, confirm which USB com port the unit is using by going to your Device Manager window on your PC
In our example, it is connected to “COM33”:
From here, open the PC control software, "Matrix-PC-tool":
Default password of Administrator is 111111:
In the first tab “Matrix Switch”, follow these steps to connect:
- 1. Under CTRL Mode, select the bubble “UART”
- 2. Select the correct COM# for the Port dropdown list
- 3. Select the button “Find via UART”
- 4. Once the device name populates in device list box, select your unit “K3”
- 5. Select the “Disconnected” button to change the status to “Connected.” If it already says “Connected”, select the button twice to reestablish connection:
Once the status box in the bottom right says “Reading: All Information Succeeded!”, you are officially connected:
2. LAN Connection
Connect the PC and unit directly via the provided Ethernet cable:
The computer must be on the same subnet as the unit to connect successfully, therefore the computer must be connected to the 192.168.0.x subnet. We can achieve this via the Local Area Network Properties on the computer.
Right-click on the internet connection icon in the lower right corner of the desktop and select “Open Network & Internet Settings”:
Select “Change Adapter Options”:
Right-click on your Ethernet connection and select “Properties”:
Select “Internet protocol version 4 (TCP/IPv4)” as shown below and click “Properties”:
Select the bubble “Use the following IP address”.
In the IP address field enter a non-conflicting IP address on the same subnet as the unit. In the example below we are using 192.168.0.200.
In the Subnet mask field enter 255.255.255.0. In the Default gateway field type 192.168.0.1. You can leave the DNS fields blank:
Click OK to apply your settings.
Click OK to close the network properties screen.
Open the PC control software, "Matrix-PC-tool":
Default password of Administrator is 111111:
In the first tab “Matrix Switch”, follow these steps to connect:
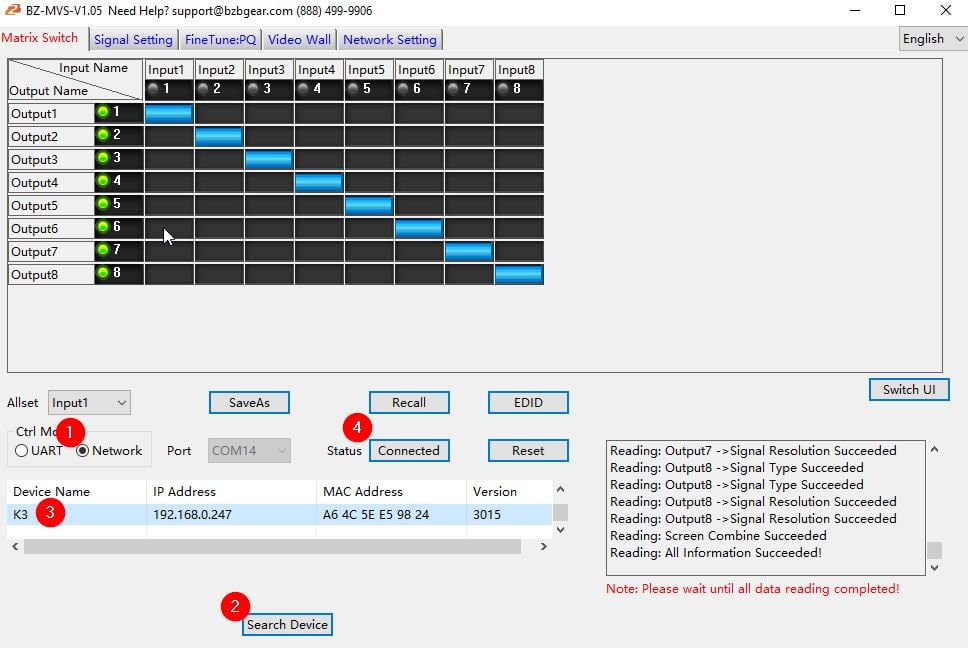
- 1. Under CTRL Mode, select the bubble “Network”
- 2. Select the button “Search Device”
- 3. Once the device name populates in device list box, select the device name “K3” (You will see the current default IP of 192.168.0.247)
- 4. Select the “Disconnected” button to change the status to “Connected.” If already says “Connected”, select the button twice to reestablish connection:
Once the status box in the bottom right says “Reading: All Information Succeeded!”, you are officially connected:
The unit is now officially connected to the PC control software for full operation and functionality. Have fun!
Get insider
updates & offers
Learn more
Get insider updates and offers
Join our vibrant community of BZBGEAR insiders today and unlock a world of exclusive updates, irresistible offers, and invaluable education.
Sales Inquiries
Leave your phone number, and one of our specialists will reach out to you shortly.
Call Us
Technical support
Monday - Friday
8.00 a.m. - 5.00 p.m. (PST)
8.00 a.m. - 5.00 p.m. (PST)
Saturday - Sunday
10.00 a.m. - 3.00 p.m. (PST)
(by appointment only)
10.00 a.m. - 3.00 p.m. (PST)
(by appointment only)
Phone & Email Support